To begin integration, go to the Azure Portal and create a new resource.
1. Choose “Create a Resource”

2. Then search for “OpenAI” and then click “Create”

3. Choose where in your Azure tenant this resource will live
– Subscription: The Azure subscription your OpenAI instance will be deployed in
– Resource Group: A Resource Group is akin to a folder on Azure. Similar resources can be grouped together to help view their total cost, and permissioned based on a Resource Group. Either use an existing one, or create a new one such as “GenerativeAI”
– Region: The Azure region/datacenter where this resource will reside. Locations geographically closer to you will have faster response times
– NOTE: We have received reports that deploying specifically to the “West US” region will prevent the integration from working with Tikit. As such, avoid using West US when deploying Open AI into your Azure Tenant.
– Name: The name of your Open AI resource. The resource can be named anything so long as it is something you can easily find later. Such as:
– TikitOpenAI
– TikitDocumentAI
– Pricing Tier: As of this writing, S0 is the only tier that can be selected

4. Choose “All networks, including the internet, can access this resource” as Tikit will need to be able to access this Azure resource

7. Finally, add any Tags on this resource if you wish. Then Review, and Submit
Once the resource has been successfully deployed on Azure, you can now configure it and upload documentation in Azure Open AI Studio. If you are prompted to use a new Azure OpenAI studio look, choose “Maybe later”.
NOTE: Uploading documentation does not append to your overall documentation AI model. If you upload a document yesterday, and a new document today. OpenAI will only use the document that was uploaded today. That said, to maintain knowledge you must upload the same documents for subsequent uploads.
NOTE: Uploading documents in different upload operations will create multiple deployments of your Open AI resource. This means you could have multiple models that Tikit can be configured against to represent different days, document sets, training attempts, etc.
1. Navigate to Chat and click on “Create new deployment”. Then fill out the following form to deploy a model. Then click “Create”. Pricing details for model selection can be found here. Given the following selection, every Token (approximately every 4 characters) processed by Open AI will cost $0.003 per input token and $0.004 for every output token that Open AI returns as a response.
– Deployment name: TikitProd
– If you choose to call this something else, take note of it as it will be required later.
– Select a model: gpt-35-turbo-16k
– Model Version: 0613 (Default)
– Deployment type: Standard
– Content Filter: Default
– Tokens per Minute Rate Limit (thousands): 120k
– Enable Dynamic Quota: True/Enabled

2. Next, it’s time to upload documents you want to use to train Open AI. In Chat, select “Add your data” under Setup.

3. In the “Add data” menu:
– Select data source: Upload files (preview)
– Subscription: Choose your Azure subscription
– Select Azure Blog storage resource: Choose or Create a new Azure Blob storage resource
– If you are prompted to “Turn on CORS” for the Azure Blob, click the button to “Turn on CORS”
– Select Azure AI Search resource: Choose or Create a new Azure AI Search resource
– Free tiers of Azure AI search cannot be used. You must use at least the Basic pricing tier.
– The Basic Tier offers 15gb of document storage
– Index Name: tikitopenaisearch
– If you choose to call this something else, take note of it as it will be required later

4. Upload your documentation. This can be text, html, markdown, pdfs, Word documents, or PowerPoints. Each file can be no greater than 16mb.

5. Data Management
– Search Type: Keyword
– Chunk Size: 1024

6. Next, select “API Key” and click Next

7. Finally confirm your configuration and select “Save and close”.
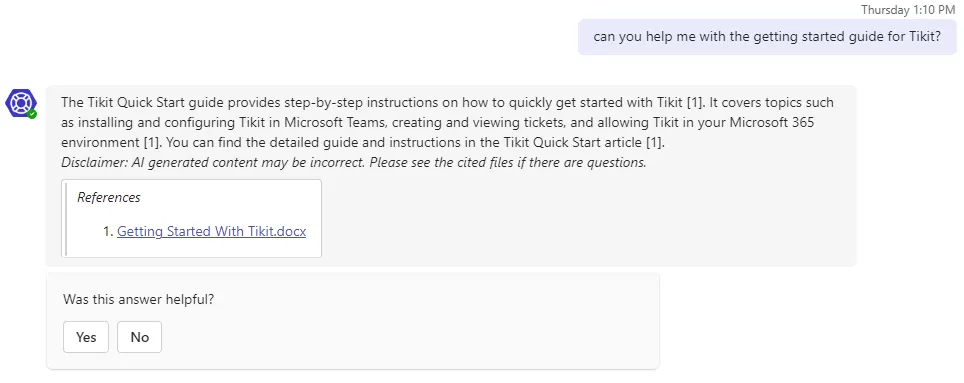
Open AI on Azure is now processing your data and preparing to respond with generative answers. You can test this out within Chat Playground. Ask a question about some of the documentation you uploaded. The following image is an example wherein documentation about Tikit’s Quick Start guide was uploaded.

We can also use this example to approximate the cost given the above configuration where 1 Token is approximately 4 characters. Please note that costs will vary and the following is only an approximation.
– $0.003 per input token ($0.003 x 57 = $0.171)
– $0.004 per output token ($0.004 x 348 = $1.392)
1. First, you’ll set your Deployment Name and Index Name. Unless these were set to something else they are:
– Deployment name: TikitProd
– Index Name: tikitopenaisearch

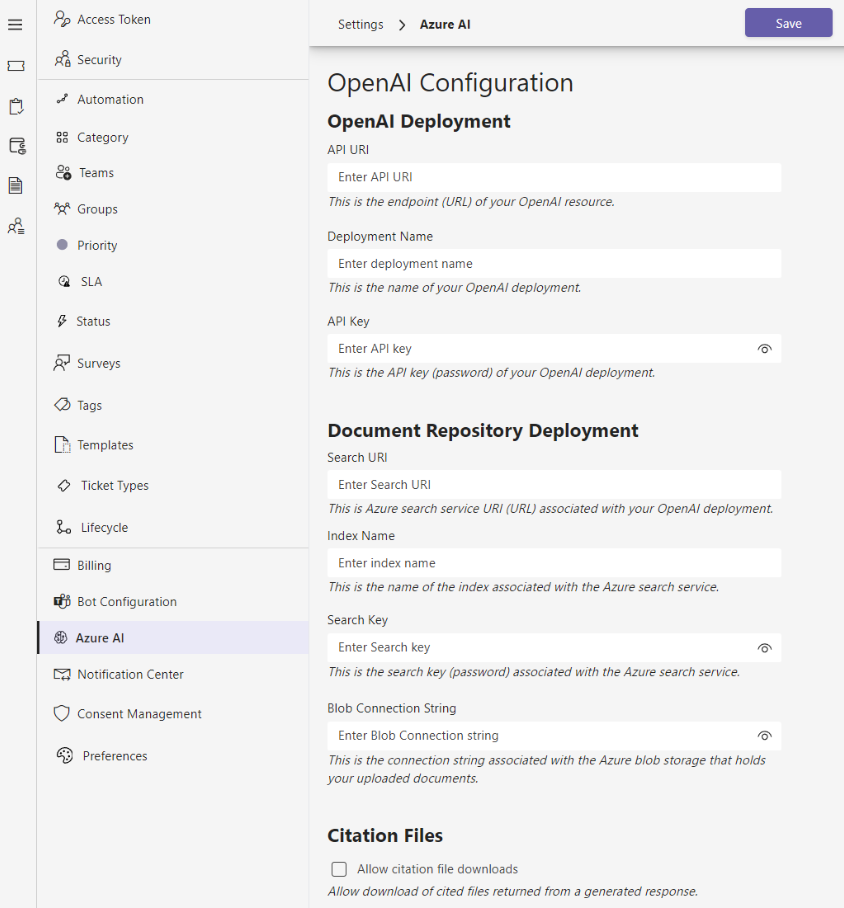
2. Back in the Azure Portal, navigate to your deployed OpenAI resource. You can view all of your OpenAI resources using this link. Click into your configured OpenAI resource. Then expand “Resource Management” and select “Keys and Endpoint”

Here you will:
– Copy either Key 1 or Key 2 and paste it into “API Key” of the Tikit configuration page
– Copy the Endpoint and paste it into the “API URI” of the Tikit Configuration page

3. Next, navigate to your Azure Search service that you configured. You can use the following link to view all Azure Search Services. Select the Azure Search Service you used to configure OpenAI. Then copy the “Url” field into the “Search URI” of the Tikit Configuration.

Then select “Settings” and then “Keys”

Copy either the Primary or Secondary Admin key and paste it into the “Search Key” field within the Tikit configuration.

4. Navigate to the Storage Account used. Select “Security + Networking” and then select “Access Keys”. Use the following link to show all of your Storage Accounts. Select the one you used to configured OpenAI. Then, click to “Show” to view one of the connection strings.

Copy and paste the value into the “Blob Connection String” within the Tikit configuration page.

5. Finally, if you wish generative answers to provide downloadable links to articles the response was based off select “Allow citation file downloads”.
Click Save and you’re done!